Another behind the scenes post! YAY :-D.
Okay so for anyone who hasn’t seen the video, take a look below as this probably won’t make sense if you haven’t watched it.
Watched the video? Good, now let’s get down to business.
The Initial Spark
As Halloween approached, I decided that I should do something to celebrate this brilliant holiday of goblins, ghosts and ghouls with a little horror video.
So as this video says in the title, the video was based solely on a creepypasta. Literally I was reading the creepypasta word for word in this video. The entire video is just a dramatisation of it. You may not realise this, but there are a lot of creepypasta channels out there.
If you google “Creepypasta Youtube channel”, probably the first youtube channel to come up would be “MrCreepypasta” which is essentially someone just reading the creepypasta with some pictures and some music.
As you may know from my channel, I like dramatising things. So I decided, why not make a simple and live action version of this creepypasta.
By the way, if you don’t know what a creepypasta is, it’s essentially a story made on the internet to intentionally scare the reader.
If you want to know more about it, click here.
So, what is so behind the scenes about this article? Well, even though the spark itself isn’t that big of a deal because I literally just did what a lot of hollywood studious do: take an already successful piece of literature and make it into something people can watch rather than read.
Well, there is the how that I can explain for this video. This means showing you this effect:
Falling into darkness effect
This effect, in other words:


This effect consisted of one main trick.
Green screen.
I have realised I use green screen for a lot of my effects! I guess that’s a pro tip.
Pro Tip: Get a Green screen.
Wait I’m not a pro, so we’ll need to call it something else that’s similar….
Prof Tip: Get a Green screen.
Okay, so What I did first was film a blank plate. This was pretty much just this for 5 seconds:

After that, I then put the green screen in with the exact same lighting (to make it look the same as the blank slate) and then filmed me doing the actions. Like so:
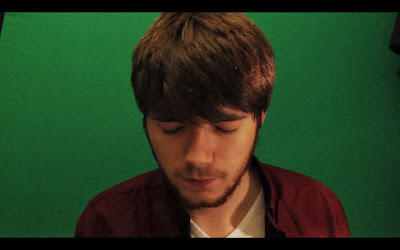
In doing this, I have now been able to separate the two assets of the actor doing the actions and the background. This allows me some creative freedom in what I can do with it. There is another way of doing this which includes a lot of masking, but green screen is less time consuming and so much easier.
So anyway, I brought both of these assets into my editing software (I used Final Cut Pro X) and placed on asset on top of another.
After using the blank slate as the base layer, I put the green screen footage over the top of it and then keyed it.
It should look like this on your editing timeline:

It should look like this on your editing timeline:
This made the actor seem like he was in the room. That was step 1 done, step 2 was making the background fall away and leaving him in darkness.
So how I did it was I took the base layer (background/ blank slate) and then added 2 keyframes. One keyframe when it was normal and one when it was at 0%, essentially it had disappeared. The two keyframes allow the transition of the fall into darkness gradual. Rather than the background disappearing, we now have it speeding away and getting smaller behind the actors head.
Upon this, we have essentially got the effect. One thing is though, it looks very blocky. Like literally it is a square getting smaller. Now if this is what you want to go for, thats it for you. Congrats you have made the effect!
But if you want to go a bit further, add either a feather mask or a vignette on your base layer footage and adjust it to when the layer gets smaller. This give it a smoother edge and doesn’t make it look as blocky.
Now just slap some sound effects on there and boom, got yourself the falling into darkness effect.
Thanks for reading! See you on the next post!

No comments:
Post a Comment