HEY HEY HEY, FREE PROMOTION FOR PILOT!
So yeah, its kinda almost the deadline. I was going to upload a blo post about editing earlier, but i was working hard to try and get the final edit perfect. But alas, let us move onto another very important part of film-making.
EDITING!
So yeah for those who don't know what editing is (which I doubt anyone who is reading this blog doesn't) its basically the bread to the cheese toasty. You've got your delicious footage in the middle and you just need that bread to bring it all together so it's not a blob of melted cheese.
Editing is the thing that can ruin your film, or save your film. It is honestly one of the hardest things for a lot of people but for me, its like weaving together a story with different materials being the shots taken for the film.
Now usually I would use Adobe Premiere because it is a very flexible and excellent editing suite. I does take a while to get used too but it has a lot of features that really help the edit. However, because I don't have it at home and uTorrent doesn't work (not like I would use it anyway :-p), I went with a slightly older editing software: Final Cut Express.
Final Cut Express has been discontinued because of Final Cut Pro X, which really does suck cause it is an excellent editing tool for beginners, but I'm not here to review products.

(Final Cut Express Logo)
First thing we always do when we open up the editing suite is create a new project and then import our footage.
Now there is multiple ways to import your footage. There is capturing the footage from the camera which puts it all into one video file and converts it into an easy format for the editor to read.
Because we used a Canon 600d for the filming, the camera separates all the takes so all we need to do is log it so we know which take is which.
A good habit to get into is logging your footage before beginning to edit. This means seperating the footage into what scene, shot and take it is in. Something that makes this easier for the editor to do is the clapperboard where you mark all these things so the whole process isn't time consuming and confusing.
LOOKY! ITS A CLAPPERBOARD:

Anyway, an example of this is seen here:
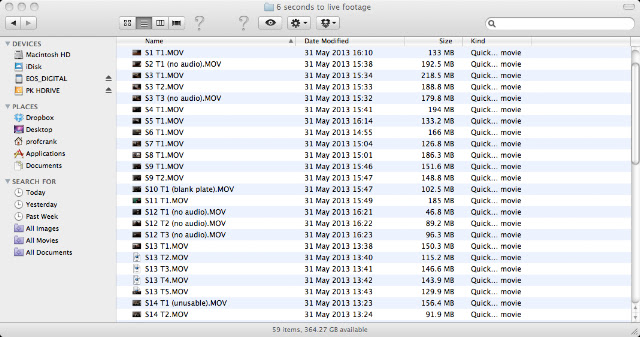
You can see that I have labelled each clip a shot and then a take. The first clip in the list is S1, T1 (Shot 1, Take 1). now usually if there was multiple scenes in the movie, the label "Sc" with the scene number would be put before the shot and take label.
This essentially makes it easier if you need to find a specific take or if your editing suite takes a dump and disconnects all the footage. It just makes it much easier to keep a track of.
Anyway, we import that into the editing suite and begin forming the scene.

Something that is quite useful and can be found a majority of editing suites is the ability to cut down the footage you want to drag into the timeline to only what you want.
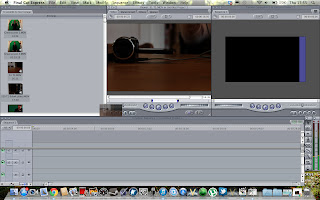
You can see on the top middle screen is blank, but if I double click of footage either in the browser on the left or the timeline, this window will show what goes on in this footage.
Now in the piece of footage already in the timeline, there is at least 10 seconds of footage of just a blank plate I don't want for the video opening. So what I'll do is crop down that footage from where I want the beginning and end of the shot.

As you can see, there are 2 lines with arrows pointing inwards on the bar above the play button. This represents the in and out points of where the footage will play on the timeline.
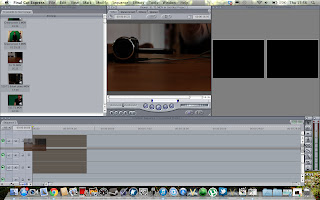
Now I simple click and hold on the picture of the preview screen and then drag that picture to the timeline and voila.

PROGRESS!
So yeah, I pretty much do that for all the footage I want to put into the video. However, they don't all go on the same level. In order to make sure the footage and audio and fluid, you need to cut in the right place and sometime even do whats called "L and J cuts".
Basically what this is is where you take two pieces of footage and overlay either the video or audio to create either a quicker or smother cut.

J cut

L cut

Overlay
Anyway lets leave behind these basics and keep going. A bit of advice on green screen, make sure there are NO SHADOWS on the green screen and that it is evenly lit. If not, it makes it a real bother to key it properly without losing any of your subject.
Keying, by the way, is the method of which you take out all of the green from a green screen to replace the background with whatever you want. For example:

Before Keying

After Keying

After Keying with Background

Final Product
PLUS EXTRA PICTURE!

Anyway, I didn't need to green screen our actor anywhere, I just needed to get his outline, saturate him and make him look like some sort of creepy monster. You'll see what I mean in the final product.
Finally came the soundtrack. Now, because of time restraints I wasn't able to compose one myself, so what I did is I went to Kevin Macleod's Incomptech. he puts up music that is under the Creative Commons Act. This means, as long as you give him credit for the music, you can use it for free. So after some digging, I found a track that suited my piece, whammed it on and voila!
I'll post an embedded link in another post, but just to mention I might go into editing again at another date.
RANDOM VIDEO TIME!
No comments:
Post a Comment